
Basic Game Overview
This was a test campaign so that I could experiment with the
rules that I have been writing for a campaign level games that allows for
battles to be fought using miniatures as a result of actions taken on the
campaign map. This campaign takes place in the area around Bavaria (southern
Germany or just north of the Alps). Both sides (France vs. Austria) have
roughly equal armies with each side supporting three army corps worth of troops
(See OOB section below). Units are represented on the campaign map as either
infantry divisions (solid color rectangle unit marker), cavalry divisions (50%
split white rectangle unit maker), cavalry screens (temporarily long grey rectangular
magnets), and artillery parks (the unit marks with two sets of three lines).
The maps used are the Murat maps found here. These maps use a node movement
system with links between nodes represented by roads. The distance between each
node is considered to be the distance an infantry division can march in 1 day
(or campaign turn). Cavalry divisions can march two nodes each turn. Artillery
can only move 1 node each turn, unless the artillery park is made entirely of
horse artillery at which point it can move 2 nodes. Units may force march 1
extra node each turn for a penalty to their combat effectiveness. This penalty
can be recovered by resting for 1 turn.
All markers that have a flag and Roman numeral indicate either
the Commander-in-Chief of the army (C-in-C) in the case of the numeral I, the
armies point of communication and supply with the home country in the case of
numeral II, or objectives that develop over the course of the game. These
objectives are worth victory points, and those points can be earned through
various means.
This set of rules is a work in progress and I have tried to keep changes rules mid game to a minimum. The only changes that I have made so far in the current game is to the “Corps Activation”, the battlefield area determination and that areas effect on cross country (not on roads) movement of troops to participate in battle.
- Initially, “Corps Activation” was going to occur at the start of each campaign turn and required that each corps roll for activation so that it could move on the map with results either being a full activation, partial activation (only 50% of units in the corps could move), or a failure to activate (no units move). This was too tedious and there were issues with some units never moving, which was going to make time efficiency/game mechanics awkward in the long run. Therefore, I changed the activation rules to only effect tasking of new “Campaign Maneuvers” or “Re-Tasking of Corps”. At the start of campaign turn 3, each corps only rolled to receive orders with a full activation meaning the entire corps got the order and can move, two partial rolls totaled up over multiple campaign turns eventually lead to a full activation (in the meantime, only 50% of the corps can move), and a fail meaning the orders were not received (either by the full corps or the rest of the corps that has not moved yet).
- The battlefield area was originally only going to only encompass the area surrounding each node. This proved to be too small an area for all of the unit markers being implemented. This also raised issues as some nodes are near each other, but roads to do not link the two nodes. As most armies in this time tried to stick to roads for long distance movement, I need a solution to allow for units that are close enough to the battle to be able to move towards the action. I decided to use a 1.5in radius blast marker from my Warhammer 40k materials to indicate the area that troops could march without roads to take part in the battle. Limits are in place to prevent units from crossing impassible terrain such as major rivers and mountains. Units that are within 1 node distance may march to the battle (either using normal movement or forced marches).
When battles occur, I will either be using the Blucher rules
from Sam Mustafa Publishing or the General d’Armee rules from TwoFatLardies.
Blucher will be for army sized battles and General d’Armee will be for
divisional sized battles.
Note: There are many details of how my rules work that I am
leaving out for expedience of time.
Order of Battle
Note: These OOBs are based upon either materials collected,
research, or guessing. In the case of the French, the OOB is based upon the
actual French formations that crossed into Bavaria in 1805 from Scott Bowden’s
book “Napoleon and Austerlitz”. The Austrian formations are based upon units
that were present at some of the battles surrounding the Ulm campaign and just
picking names out of a hat. Austrian military practice did not lend itself to a
strong level of consistency regarding unit formations at this time, which
resulted in the makeup of divisions and corps changing quite often. Since this
would make a tedious game mechanic to deal with, I have taken the army corps
system bat and hit the Austrian’s with it enough times to make something work
for me.
For brigades that say (cont.), these were brigades that were
broken up in order to make parity of unit sizes more appropriate as regimental
sizes were not consistent between nations, hence why a lot of the Austrian
cavalry regiments are considered to be their own brigade at times. These edits
were also made to make adaptions to the Blucher and General d’Armee rules work
a lot better.
-French
C-in-C: The Emperor Napoleon Bonaparte
Note: The Bavarian divisions are attached to I Corps.


Note: 2nd Cav Division is actually from the French
Cavalry Reserve from 1805. This division is considered to be attached to the II
Corps.


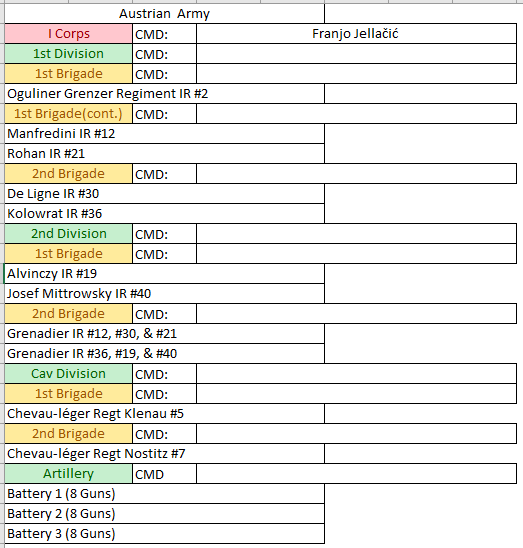
-Austrians
C-in-C: Karl Mack von Leiberich
Note: Due to a lack of information on the command structure of the Austrian army, I have left many of the Corps, Division, and Brigade commander names blank. Also this OOB does not follow the methods and organization of the Austrian army of 1805. This is all made up.


Campaign Start
The campaign starts with the French deployed to the North
with about 50% of the army not yet having crossed the Rhine River. The French
are deployed in multiple columns with cavalry screens deployed in front. Though
the initial deployment appears to be dispersed in order to aid with movement
across the map, a detailed view will show that the French I and II Corps will
unfortunately be forced to cross paths just as they cross the Rhine, causing a
bottleneck that will slow down movement (see Figure 2 for more detail on the
French deployment). The French III Corps will not have this issue.
The Austrians are deployed in roughly a two-column formation
as they come out of the Tyrol mountains with the II and III corps forming a
larger and denser column marching in close support. The Austrian I Corps is
deployed more towards the east.


Figure 1 - Initial Army Deployments
Objective Rolls
This part only happens one time at the start of each game. Before
turn 1 commences, both sides role a single 6-sided die (d6) to determine what
roll each side will take in the game. The French come out as the aggressor with
the campaign goal of defeating or routing the Austrian army. This translates
out to Frenching achieving a victory condition if they are able to rout or
destroy 50% of the Austrians. The Austrians will take on the role of the
defender, seeking to survive for a certain number of campaign turns. For now,
that limit is set at 15 turns (Note: this being my first game, I am not sure if
this is too many turns or too few).
Campaign Turn Phase Order
Each campaign turn will have the following phases. These phases are considered to happen simultaneously with each side completing the same phase before moving to the next part of the turn. There is an initiative roll to see which side makes the first move in each phase. (Note: I may work this into some of the game mechanics later to have an effect such as initiative winner having advantage on engaging the enemy or something like that.)
- Roll Initiative.
- Both sides roll a d6, winner gets to move first.
- Resting and Resupply.
- Both sides may choose to designate some of their divisions to rest and resupply. By doing this, units that are fatigued due to forced marches and at reduced strength may regain some of their combat effectiveness.
- Issue campaign maneuver orders.
- Each side draws from a deck of cards, the number value of the card determines which maneuver the army will attempt to undertake. Each maneuver requires that a certain number of army corps be assigned to the maneuver. The maneuver type will create an objective that will help that side earn some victory points each time a maneuver is completed.
- In this game the maneuver limit is set to 2. Therefore, each side can only run two maneuvers at a time.
- Roll activation.
- Once an army corps is assigned to a maneuver, there will be a roll for activation. This basically checks to see if the orders reached the corps commander or not. The presence of cavalry screens allows for some re-rolls of activation.
- Move units.
- Both sides move units. Units moving into contact with enemy units will allow for the chance of a battle to happen. If the opposing sides wishes to disengage, they may try to move away from the contact area if involved army units have the available movement ability.
- Commence battle.
- Battles are played out and fought using either Blucher or General d’Armee.
Turn 1
Turn 1 starts with the Austrians winning the initiative
roll. Their maneuver pull ends up with General Mack ordering that the Austrian
II and III Corps being assigned to concentrate in the area of Ravensburg
for defense (Austrian objective III). They must take and hold this area of 8
campaign turns to achieve the objective. The Mack decides to not issue a
maneuver to I Corps for the time being as he wishes to see what moves the
French will take as the aggressor. The Emperor Napoleon decides to activate two
maneuvers, first assigning the French I Corps to flank the Austrian lines with
the intent of eventually cutting off the Austrian lines of communication. The
objective will be to march and concentrate the French I Corps at Sargenz (French
objective III). The French II and III Corps are assigned a maneuver with the
task of pinning the Austrians in place by taking positions or engaging the
Austrians around the area of Weissenhorn (French objective IV).

Figure 2
- Initial Campaign Objectives
Problems arise as the initial orders are sent out, as the
Austrian II Corps fails to receive its orders in spite of the presence of an
active Austrian cavalry screen protecting against French agents. The elements
of the Austrian III Corps are able to receive their orders and they begin
marching to Ravensburg. The French have better luck as both I and III
Corps receive their orders, but the French II Corps is unable to receive its
orders leaving Napoleon rather irritated as he watches Marshal Marmont’s troops
make no progress at all that day. The French I and III Corps begin marching
towards their objectives. Both sides push some of their cavalry further out
than the main body of the infantry with the hope of reducing congestion and
possibly seizing objectives sooner. (Note: I made a small mistake and forgot to
take pictures of the Turn 1 movements. Which means Turn 2 movements will appear
as though both of the armies moved more than they should be allowed to move).

Figure 3
- Austrian Turn 1 Movements

Austria continues to hold the initiative going into turn 2. The Austrian general Mack decides to assign another maneuver to the inactive Austrian I Corps, the maneuver orders I Corps to take and hold Donauworth (Austrian objective IV). With the new orders written and dispatched, only the Prince of Schwarzenberg’s Austrian II Corps makes any movement this turn as they continue to move towards Ravensburg. The French are more productive with both II and III Corps making progress towards their objectives.

Figure 5
- Objectives as of Turn 2
At this point the, the first elements of the Austrian II
Corps achieved their order to begin concentrating around Ravensburg for
future defensive operations. At the start of Turn 3, the counter will begin
counting down until the objective is achieved. The Austrian general Mack
decides to go with a broader line of defense that will cover both crossing
points at the Ravensburg and at Ulm. To achieve this the Austrian
III Corps will mass at Weissenhorn (shown in Figure 6 as the French
objective IV).

Figure 6
- Austrian Movement Turn 2
The bottleneck situation starts to develop, and the French
seek the best way to move two Corps across the Rhine River under the watchful
and expectant gaze of their Emperor. The Marshal Davout’s French III Corps,
unaffected by this issue make headway moving towards their object. The III
Corps commander decides that the best way to achieve his assigned orders is to
march towards Nordheim and then approach Weissenhorn (French
objective IV) from the northeast. III Corps cavalry is sent out far ahead of
the slower moving infantry and artillery to attempt to take possession the
crossing point.

Figure 7
- French Movement Turn 2
Turn 3
At the start of turn 3 I implemented a new method for dealing
with activation. From the notes that I had been taking of the game so far, I
determined which Corps had received their orders according to the changes that
I already discussed above.
At this point French took the initiative of the first time in the game, with all orders properly distributed to his Corps commanders, the only thing for Napoleon to do for the next several turns was watch the developing situation for any opportunities. General Mack’s army final finds it legs and gets fully underway, however by this time Jellačić’s Austrian I Corps is far behind schedule for taking their objective at Donauworth. General Mack is also starting to find a bottle neck of his own as most of Feldmarschall-Leutnant von Werneck’s Austrian III Corps is strung out on a march that will take several turns to allow for a proper concentration of such a large formation. Only Schwarzenberg’s II Corps makes any successful headway this turn as the Prince is able to finish concentrating his army in the area of Ravensburg and Friedrichshaven. (Note: there are force concentration limits that are in place for each node. Hence why every army Corps is not stacked up on a single node and why the Austrian III Corps did not all meet up at Ravensburg).

Figure 8
- Austrian Movement Turn 3
The French make progress with most of Bernadotte’s I Corps and all of Marmont’s II Corps across the Rhine River. At this point word reaches Marshal Davout about the strength of Austrian concentrations near the Danube River. Not wanting his cavalry to get caught in a surprise pincer movement, orders are written and dispatched as soon as possible to recall the cavalry from its advanced position. These orders will not take effect until the next turn.
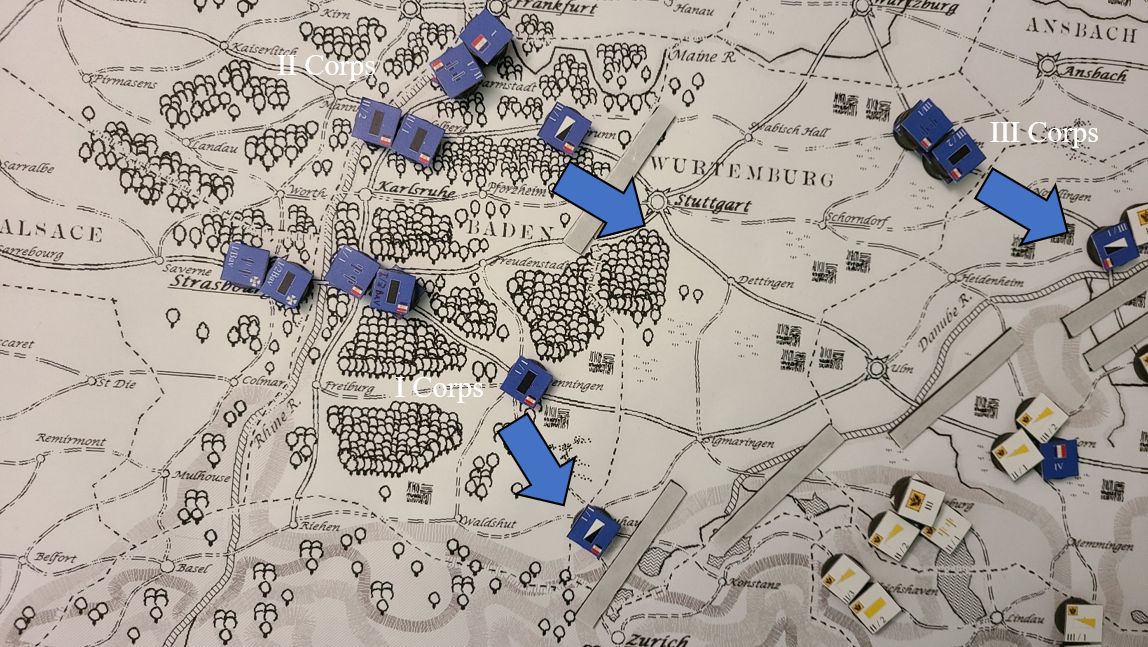
Figure 9
- French Movement Turn 3
To be continued...
No comments:
Post a Comment