
Turn 4

Figure 1 - Campaign Overview Start of Turn 4
The French maintain initiative this turn, and Napoleon realizes that the bottleneck at the Rhine River has put his army in a potentially difficult position. One third of his army is far closer to the Austrian position and the nearest support is several days away. Marshal Davout realizing this problem, decides slows his forward progress and recalls his advanced cavalry to await the arrival of the Napoleon with Marmont’s II Corps. Napoleon orders that Marmont send his light cavalry division further out in front so that it will be in supporting distance of Davout’s III Corps.

Figure 2 -
French Movement Turn 4
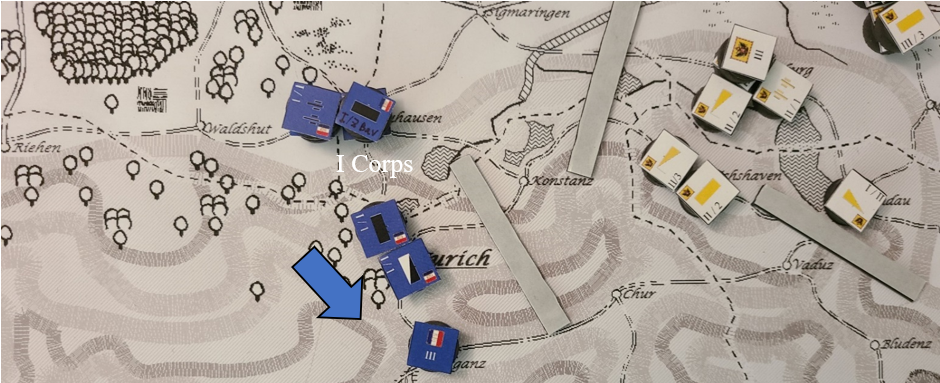
Bernadotte’s I Corps is starting to near their indicated objective as the last of the Bavarian units attached to his Corps finish crossing the Rhine River. General Mack senses an opportunity to potentially take out one of the French Corps and begins preparations to launch a two pronged attack on the isolated French III Corps. Nothing can be done this turn as the last elements of von Werneck’s Austrian III Corps are still moving onto the lowlands just north of the Tyrol mountains.

Figure 3 - Austrian Movement Turn 4
Turn 5
In spite of seeing an opportunity to deal a heavy blow to
the French III Corps, the Austrians are not able to capitalize on this
motivation and once again lose the initiative to the French. General Mack will
issue a new set of order to von Werneck’s III Corps directing him to attach his
Corps to the Austrian objective to take and hold Donauworth (Austrian
objective IV). Luckly, these orders reach von Werneck and the Austrian III
Corps is able to make movements this turn towards completing this goal. General
Mack seems to be planning on trying to hit the French III Corps with his own
Austrian I and III Corps.
Napoleon continues to march with Marmont’s II Corps, but orders are sent out to have the attached heavy cavalry division to move on ahead at speed to hopefully put them in a position to support Davout’s III Corps should the Austrian’s make a move to try and attack him. It seems that both sides are gearing up for a battle on the northern bank of the Danube River sometime within the next couple of turns.

Figure 4 - French Movement Turn 5
Marshal Bernadotte I Corps continues moving on the Austrian flank without any issues. Even without one of his Bavarian divisions and the Bavarian artillery park, the forces he is amassing are more than capable to take on the Austrian II Corps in a battle.
General Mack accompanies von Werneck’s Austrian III Corps as
it crosses the Danube River. The plan to hit the French III corps is in place
and troops are moving. However, Davout has not made it easy for the Austrian
general. Davout’s sudden drop in forward progress has made it so that the
Austrians must cross the Danube in force if they hope to come to grips with the
French, putting the Austrian army in a tricky situation should fortune suddenly
turn on the aggressive Austrian army. To compensate for this potential problem
orders are sent out to the trailing 3rd and 4th divisions
of the Austrian III Corps to force march towards their objective. The gain in
speed will hopefully allow the Austrians to concentrate their army faster than
Napoleon can bring up his own troops to confront the Austrian river crossing. This gain in speed does come with a price as
these two Austrian divisions will suffer from fatigue due to the forced march
until they can rest and recover. General Mack hopes to have his troops
concentrated for an attack within the next turn.

Figure 6
- Austrian Movement across the Danube River Turn 5
Down towards the southern end of the Austrian lines (see
Figure 5) the Prince of Schwarzenberg continues to hold his position. By the
end of turn 5 the Austrians have held this objective for 3 campaign turns out
of the required 8.
Turn 6
The French narrowly maintain the initiative this turn.
Marshal Bernadotte’s I Corps finishes its movement towards Sarganz and
sends word to Napoleon informing him of the successful completion of one of the
French objectives. Napoleon will not be able to issue a new set of orders to Bernadotte
until the next campaign turn. Either through luck or proper planning, Bernadotte
has managed to position his corps so that it can take multiple roads towards
either attacking the Austrian II Corps or continue the flanking movement on the
Austrians. The Prince of Schwarzenberg continues to look on, holding his
position and hoping that the terrain in the area will prove to be more helpful
to his own Austrian troops, rather than aid the Bavarian and French troops of
the French I Corps of the course of the coming turns.

Figure 7 – French I Corps Movement Turn 6
In the north, Napoleon continues to move with Marshal Marmont’s II Corps. Most of II Corps has now made it to positions that place the French II and III Corps in supporting distance of each other. This is further improved by the availability of many roads in the area north of the Danube River.
General Mack’s army on the other hand is looking at a much
harder enemy to engage than was first anticipated. Jellačić’s Austrian I Corps
is able to complete its object of taking Donauworth this turn and his
troops are near enough to either offer support to the Austrian III Corps or
receive support in turn.

Figure 8 - French and Austrian Movements Turn 6
The next turn will determine whose plans come to fruition first.
Turn 7
At the start of turn 7 the French manage to maintain the initiative, probably through the hard driving efforts of Napoleon himself and his excellent staff work provided by Marshal Berthier. Napoleon has orders sent out to Marshal Bernadotte, ordering him to make a piercing attack on the Austrians with the intentions of either cutting off the Austrian II Corps’ communications with the Austrian main body (the I and III Corps north of the Danube) or by driving the Austrian II Corps away from the Austrian main body by routing it and causing them to fall back upon their lines of communications. This will be achieved by either taking and holding both Stgmaringen and Memmingen (French objectives V and VI) or by driving the Austrians away from Ravensburg (French objective VII. Recall that Austrian objective III is to hold Ravensburg).

Figure 9
- New French Objectives Turn 7
To begin executing these orders, Bernadotte orders some of the trailing Bavarian troops to immediately move on Stgmaringen, completing half of one of the possible goals of his new orders. The rest of Bernadotte’s Corps begins marching towards Ravensburg by marching through Zurich. It appears that Bernadotte has wisely decided that splitting his Corps in two is not a wise solution to the problem. The Prince of Schwarzenberg continues to hold his ground as the different elements of his Corps are in excellent supporting distance of each other.

Figure 10 - French I Corps Movement Turn 7
In the north Napoleon decides to not wait on the decisions
of General Mack any longer. Orders are sent to both Davout’s III Corps and
Marmont’s II Corps to make all haste and attack the Austrians to their front.
The French II Corps under Marmont will focus on pinning the Austrian III Corps
in place while the French III Corps under Davout will attack the much smaller
Austrian Corps at Donauworth (the Austrian I Corps under Jellačić). The
intention is for Davout to drive off the Austrian I Corps and then swing his
own French III Corps around and support Marmont’s troops. This entire plan does
require that some French units force march towards their destinations which
will result in those troops arriving later in the day and they will be
fatigued.
As the first French columns being to come into view, word is
quickly sent to General Mack. Mack immediately orders that von Werneck
concentrate his entire Corps at Heidenheim to confront the approaching
French II Corps. No additional aid can be sent to Jellačić’s I Corps as the 3rd
and 4th Divisions of von Werneck’s III Corps are about to be engaged
by the leading elements of Marmont’s II Corps themselves. Any aid for Jellačić’s
will have to march through Heidenheim, so it is imperative that the town
be held.

Figure 11 - Battlefield Situation
Notes on the above Figure. Each solid rectangle represents a Division of infantry, each half white/half blue or yellow rectangle represents a Division of cavalry, each double grid lines (looks like a big equal sign) represents an army corps artillery park. This battle will be fought using the Blucher rules set. All units not starting inside the black rectangle will be arriving as reinforcements some time during the battle.
The Coming Battle
-French Army
Totals: 16 brigades of infantry, 8 brigades of cavalry, and
3 units of artillery.
At the start off the battle the French will have 10 brigades
of infantry, 6 brigades of cavalry and 0 unit of artillery on the field.
The French will attempt to recall their deployed cavalry
screens to join the battle. This constitutes a total of 2 cavalry brigades.
-Austrian Army
Totals: 17 brigades of infantry, 6 brigades of cavalry, and
3 units of artillery.
At the start off the battle the Austrians will have 11
brigades of infantry, 3 brigades of cavalry and 3 unit of artillery on the
field.
The Austrians will attempt to recall their deployed cavalry
screen to join the battle. This constitutes a total of 1 cavalry brigades.
My next report will cover the battle itself.

No comments:
Post a Comment