
The Battle
of Donauworth & Heidenheim Overview and Setup
Battle 1 – During Turn 7 of the Campaign.
French: Attacker
Objectives drive Austrian army from the field and seize both
Donauworth & Heidenheim.
Austrians: Defender
Hold both Donauworth & Heidenheim until
the end of the battle.

Starting on the field of battle in the northwestern corner
of the battle area. Marshal Marmont is present at battle start.
Note: The 8th Regiment of Chasseurs is considered
to be deployed as a cavalry screen.

Starting on the field of battle in the northeastern corner
of the area of battle. Marshal Davout is present at battle start.
Note: The 7th Regiment of Hussars is considered
to be deployed as a cavalry screen.

Arriving as reinforcements from the direction of Schorndorf.
C-in-C: Emperor Napoleon Bonaparte
Arriving as reinforcements from the direction of Crailsheim.
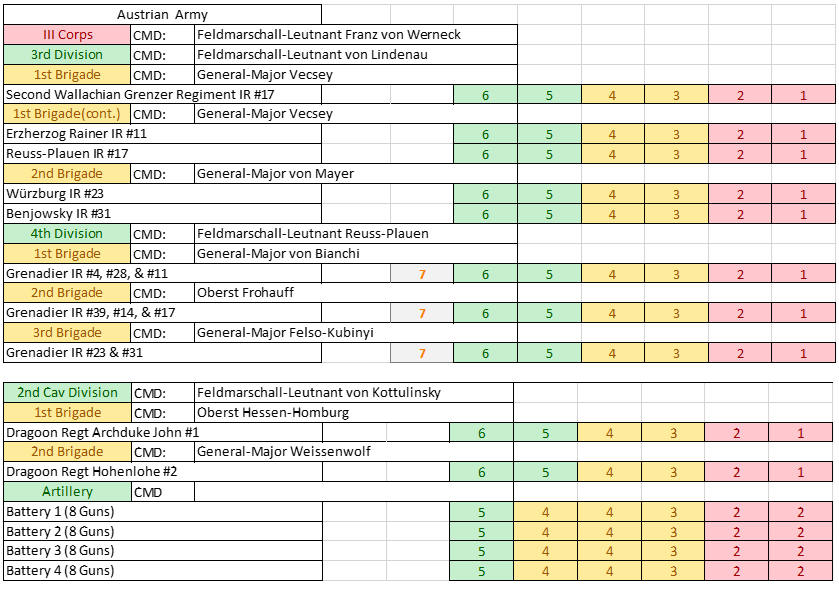
Austrian OOB
Starting on the field of battle in the southeastern corner
of the battle area. Fieldmarshal-Lieutenant Jellačić is present at the battle
start.
I updated the OOB is showed in my previous report to provide
names for brigade and division commanders. These are not historically accurate
for the most part as an accurate OOB does not exist for the Austrian army
around Ulm at the start of the 1805 campaign. The names are drawn from
the OOB of the Austrian army from 1809.
Note: The Chevau-léger regiment #7 is considered to be
deployed as a cavalry screen.

Starting on the field of battle in the southwestern corner
of the battle area. Fieldmarshal-Lieutenant von Werneck is present at the
start.
Arriving as reinforcements from the direction of Ulm.
C-in-C: Quartermaster-General Karl Mack von Leiberich

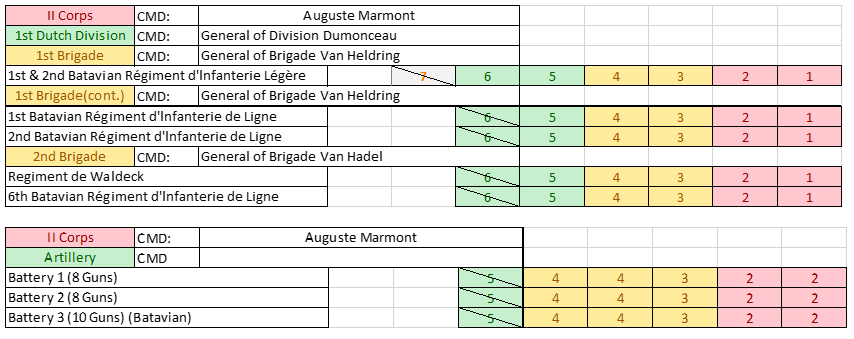
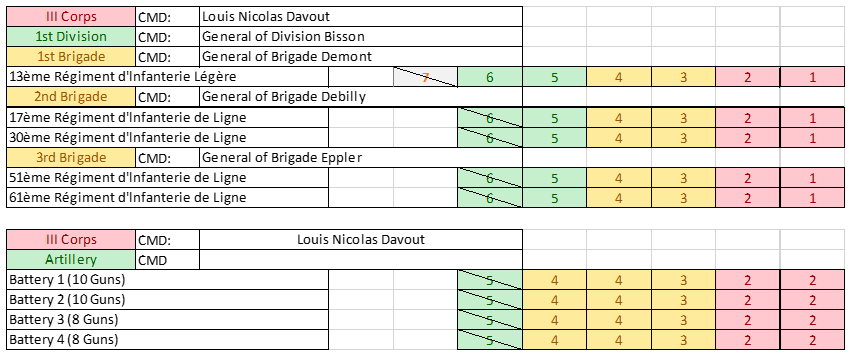
-Notes about the OOBs.
Each brigade is represented as a single 60mm square base on game
table. The color-coded number bars are used to track “Combat Effectiveness”
(CE) of units on the campaign map. For the Blucher rules, the average combat
effectiveness of the brigade is calculated to determine strength (referred to
as Èlan
in Blucher) of the brigade going into battle. Artillery is based as collection
of artillery batteries, with each base representing two batteries from the OOB
(basically take the number of batteries in the artillery park, divide by 2 and
round down). Units that have a \ through one of the color-coded number grids
are suffering from fatigue due to forced marches. This effect will count as a
-1 to the units CE, which then translates to a loss of Èlan on the battlefield.
Map Overview
The battlefield spans an area that encompasses both the
towns of Donauworth & Heidenheim with the Danube River
running near the two towns. The Austrian I Corps, if it needs to can either
retreat to the north towards Weiseburn or back across the Danube River
towards Nordheim (see the larger map of the area from previous reports
or find the entire map from the Murat Maps website). Feldmarschall-Leutnant Jellačić’s preferred
route of retreat would be back across the river as a move towards the north
would drive his corps further from the Austrian main army.
The elements of the Austrian III Corps present at the start
of the battle have a little more leeway with the direction of retreat, as a
move south towards Ulm would allow Feldmarschall-Leutnant von Werneck’s
3rd Infantry, 4th Infantry, and 2nd Cavalry Divisions
to link up with the rest of the Austrian III Corps. The challenge that von
Werneck sees though, is that if any of his units retreat towards Ulm,
they will slow down the arrival of the rest of the Austrian III Corps to the
battle. This results in von Werneck deciding that if the elements of Austrian
III Corps that are at Heidenheim need to withdraw throughout the battle,
those troops will retreat across the Danube River. However, if his entire force
needs to retreat, then he will withdraw towards Ulm if the way is still
open.
Both Marshal Marmont and Marshal Davout have more open lines
of retreat, but they must both be wary of withdrawing troops via the roads that
they themselves used to arrive on the field, as this will slow the arrival of
the rest of the French army that is still marching towards the battle.

Figure 2
- Overview of the Battle. The Angle of this photo matches that of Figure 1
Turn Breakdown: with arrival times of reinforcements.
Note: Each division or artillery park marching to the battle rolled a 10-sided die and added 5 to the value before the start of the battle. This number indicates the turn number upon which that division or artillery park may attempt to start arriving on the field of battle. I am using a modified arrival rule for Blucher, where upon reaching the end of the turn on which that unit may arrive a 10-sided die is rolled. The result of this roll plus 5, has to be lower than or equal to the current turn number for that unit to arrive on time. If a unit fails to arrive on time, that unit’s arrival time is pushed back. If the pushed backed arrival time interferes with the arrival time of a second unit, the second unit cannot arrive on the battlefield until the first unit arrives. This is to simulate the fact that units marching along the same roads could cause delays in arrival times if the leading elements were delayed.
Example using the below Turn Breakdown
- The Austrian III Corps’ 2nd Division arrives on turn game 7. They rolled a 6. After adding 5, this result of 11 is not low enough to permit the troops to arrive.
- On turn 8, the same unit rolls for arrival and rolls an 8. This still fails to meet the requirement and the troops fail to arrive as well (total of 13
- On turn 9, the same unit rolls for arrival and rolls a 2 (total of 7). This value meets the requirement, which then allows the Austrian division to arrive.
- If the Austrian Division had continued to fail all the way to game turn 10, this would push back the arrival of the Austrian III Corps’ 1st Cavalry Division, which could only begin rolling for arrival after the 2nd Division clears the road.
- This only where multiple units are using the same single road to arrive at the battlefield. The French III and II Corps units are marching on different roads, which means that the French III Corps’ 1st Division would have to fail to arrive 8 times to have any affect the arrival of the French III Corps’ 1st Artillery Park.
In the Blucher game, turns are
broken down into the actions taken by both players during their opportunity to
act during that game turn. This in a sense means that there is at most a total
of 30 turns in the game instead of the 15 advertised in the rules. I have
broken this down in the below Table 1, but for the purposes of this battle
report will be referencing the game turns. The French have the initiative as
they started the battle by attacking the Austrians.
Table 1
- Blucher Turn Breakdown.

Both sides have deployed cavalry
screens that need to be recalled for the battle. Starting with turn 1 of the
battle, each side will roll a d6 per brigade trying to enter the field as a
recalled cavalry screen. On rolls of 1-3, the recall is a failure. On rolls of
4-6, the recall is a success, and the brigade arrives. Each side may roll each
turn until the brigade arrives. Arriving cavalry screens appear on the edge of
the battle closest to their parent division and do not interfere with the
arrival of other units as reinforcements.
Initial Army Morale
Blucher determines when the game
ends by assessing the morale of the army or by completing all 15 turns. One way
the game ends is achieved when the morale of one side breaks causing them to
withdraw from the field of battle. Morale is determined to be one third of the
total number of brigades in the army (rounding up fractions and barring other
modifiers form commanders). This calculation excludes artillery units. An army’s
morale is broken when the number of broken units (infantry, cavalry, and
artillery) matches or exceeds the above calculated morale value. Units that
retire off the field do not count against the morale, only units that have had all
of their Èlan
exhausted count as broken. The morale total may change throughout the battle as
new units march onto the field, the max total possible does not go down. This
has the effect of assigning a lower morale to armies that have fewer units on the
field at the start of a battle, but that moral can improve as time goes by with
reinforcements arriving.
The French army starts the battle
with 16 brigades on the field. This results in a morale of 6 for the French.
The Austrian army starts the battle with a total of 14 brigades on the field.
This results in a morale of 5 for the Austrians.
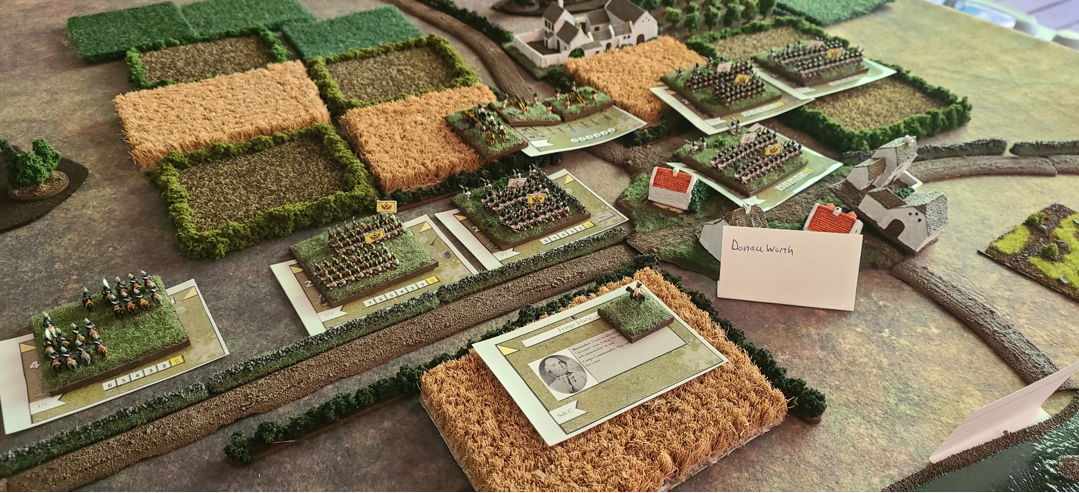
Army Deployments
Below are some pictures of the
miniatures before they are deployed onto the battlefield. The figures are
facing the wrong way on the cards at this time as I had not attached the cards
to the figure bases yet. Note: I have to use proxies every once in a while, as
buying and painting both armies along with all of the needed terrain takes a
lot of time and money.

Figure 3
- Initial Austrian Troops.


Figure 5
- Initial French Troops

As soon as the marching columns of the French infantry were
detected, the Austrian generals deployed their troops towards the west of Donauworth
& Heidenheim. Both Austrian Corps were forced to deployed in the
farms and fields, trampling many crops. Von Werneck deployed his artillery to
watch the road towards Heidenheim and the open fields towards the north.
Deciding that his link with Quartermaster-General Mack and the rest of the
Austrian III Corps was of highest importance, von Werneck places his 4th
Infantry Division, the elite grenadier division, in the fields to the southwest
protecting the road towards Ulm. With his cavalry held in reserve von
Werneck awaits the French attack.

Figure 7
– Austrian III Corps Deployment Around Heidenheim
Jellačić takes up a similar deployment with most of his
strength, the I Corps 2nd Infantry Division and what Cavalry is on
hand deployed towards the southwest protecting the link between Donauworth
& Heidenheim, the rest of his corps is deployed towards the north of
Donauworth, with the artillery watching the road.
Marshal Davout deploys his 3 divisions into a line of battle
with the stronger 2nd Infantry Division on his left and the 3rd
Infantry Division with the cavalry on his right. Davout plans to only hold his
cavalry in reserve at the battle start as he is seeking to defeat Jellačić’s
Corps as quickly as possible.

Figure 9
- French III Corps Deployment on the road from Crailsheim
Marshal Marmont intends to commit most of his Corps to the
battle early on, only keeping the attached Reserve Cavalry Cuirassier division held
in reserve. Marmont realizes that if he can defeat this greater concentration
of Austrian troops before any reinforcements arrive, he can have an easier time
in the battle once Davout finishes with the Austrian I Corps. Marmont deploys
his corps in a line running north to south with his 1st Infantry Division
being on the extreme left, followed by the light cavalry of II Corps, the 2nd
Infantry Division, and the Reserve Cavalry division on the right.

Figure 10
- French II Corps Deployment on the Road from Schorndorf
Battle Objectives
These objectives will help govern how the outcome of the
battle determined.
The French major objective is to take both Donauworth
& Heidenheim before the battle ends, effectively driving the
majority of the Austrian army back across the Danube River or breaking larger
formations of Austrian troops against the barrier of the river. Successfully
accomplishing this will result in a French major success (Austrian major
failure). This result will also open up the possibility for the as of yet not
arrived elements of the Austrian III Corps to be isolated and defeated on its
own.
The French will score a moderate success (Austrian moderate
success) if they manage to take only one of the two towns before the end of the
battle (finishes on game turn 15). This has the possibility of generating
several different outcomes depending on the which town is taken. Taking Donauworth
might result in a rear-guard action from the Austrian I Corps as it retreats and
major engagement as the Austrian III Corps unites. Or it could result in a
series of smaller engagements as both the Austrian III Corps and I Corps fall
back depending on the quality of the Austrian and French armies as the end of
the battle.
The French will score a minor success (Austrian minor
failure) if the battle ends with only having achieved the breaking of the
Austrian morale. This means that Austrian army would still be in a state to
offer battle at a later date. Such an outcome will also result in two or more rear-guard
actions as the Austrians seek to withdraw from the battle. The nature of these
actions will depend on the positioning and status of both armies at the end of
the battle.
The Austrians major objectives are to hold both Donauworth
& Heidenheim by the end of the battle (finished game turn 15 or
French morale broken). This will be counted as a major Austrian success (French
major failure). This result will allow the Austrian army to cement their hold
on the north banks of the Danube River, potentially leading to the French Army
being split in two.
The Austrians will score a moderate success if the battle
ends (finished game turn 15) and they are only holding one town. See the above
French moderate success for outcome possibilities.
The Austrians will score a minor success (French minor
failure) if the battle ends with only having achieved the breaking of the
French morale and not holding the towns. This would mean that the French took
possession of both towns, but now lack the ability to hold those towns.
There are other factors that will influence the results of
the battle, such as the state of the two armies and the number of
reinforcements that have arrived on the battlefield. This will influence the
above results, as the ability to continue fighting from the time that the
battle ends will influence what the commanders on the scene deem to be
achievable by their remaining troops.
The positioning of the armies will also play a role in what
happens after the end of battle, if the French are able to cut lines of retreat
or reinforcements, the Austrians may be less inclined to continue fighting as
the Austrian’s may be forced to retreat in unfavorable directions.
No comments:
Post a Comment