
The Morning of Battle: The Opening Shots
Turns 1-4
The battle opens with both French corps moving to attack the
Austrians. Marshal Marmont orders that his corps should attack in echelon by
division, starting with his 1st Infantry Division leading the start
of the maneuver. The goal is to break the Austrian troops guarding the road to Ulm,
potentially hindering the arrival of reinforcements from the rest of the
Austrian III Corps. A normal attack in echelon attack would typically have
started on the opposite end of the French line from the intended target, but
Marmont is hoping to throw off the Austrian general and get him to concentrate
on the wrong objective, as the link between the two Austrian Corps on the field
is just as important as the road to Ulm.

Figure 1 - French II Corps Advances in Echelon to Attach the Austrians
Von Werneck’s Aid-de-Camps (ADC) notify him of the movement of French troops and what their assault might entail. Seeking to blunt the French troops before they can hit his lines, von Werneck orders his 4th Infantry division to flank the oncoming French assault. Breaking the French right flank will both blunt the oncoming attack and protect the road to Ulm. Three brigades of Austrian Grenadiers move out to attack on the oncoming French. It seems Marmont’s ploy has failed.
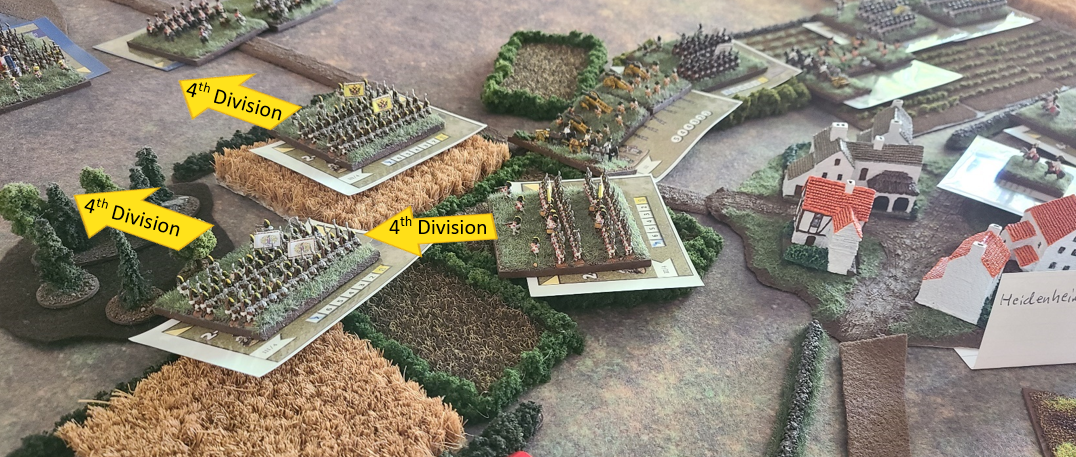
Figure 2
- Austrian Grenadiers on the Move. I had to use regular Austrian infantry as
proxies for this division.
As these maneuver orders are being issued and ADCs are
rushing around the field, the artillery of the Austrian III corps splits its
fire and targets the French II Corps cavalry and 2nd Infantry
Division scoring hits on both formations.

Figure 3
- Austrian III Corps Artillery Fires on the Approaching French
Marshal Davout opts for a more straight forward attack and
orders his two infantry divisions to make a concentrated attack towards the
town of Donauworth. Davout intends to use his superior numbers in
infantry to overwhelm the Austrian I Corps. The III Corps cavalry screen is
also able to arrive on the field of battle without any delay.

Figure 4
- French III Corps Advances
Jellačić responds to Davout maneuver by ordering his 1st
Infantry Division to make a spoiling attack on the advancing French columns.
The goal of this maneuver is to engage the French troops before they can get
into an advantageous position and then force them to waste time slowly pushing
the Austrian troops back.

Figure 5
- Austrian’s Head into the Farmhouse and Orchard.
The artillery of the Austrian I Corps targets the 15th
Légère (light infantry) of Davout’s III Corps 2nd Infantry Division,
as they boldly march up the road to Donauworth.

Figure 6
- Austrian I Corps Artillery Scores Hits on the French
In spite of the Austrian artillery fire, the French columns retain their high levels of momentum. The cavalry of the French II Corps sees an opportunity to reduce the damage being done by the Austrian artillery and charges forward with the mixed cavalry brigade of Batavian Hussars and Batavian Light Dragoons leading the way. The French II Corps 1st Infantry Division moves into skirmish range of the advancing Austrian grenadiers and their voltigeurs begin to snipe at the grenadiers hoping to weaken the grenadier’s formation. The French II Corps 2nd Infantry Division gets slowed down by difficult terrain, which will delay their participation in the echelon attack and keep them under Austrian artillery fire for a longer period of time.

Figure 7
- French II Corps Begins its Attack
Marshal Davout encourages his infantry to continue the advance and sends word to the newly arrived cavalry screen and the rest of his cavalry division to begin moving towards the road between Donauworth & Heidenheim with the intention of cutting off this line of communication between the two Austrian army corps.

Figure 8
- French III Corps Advancing Through Farms and Fields.
The 4th Division grenadiers of the Austrian III
Corps watch helplessly as the gunners of the nearby artillery batteries are run
down by the hard charging Batavian cavalry brigade. With the guns spiked and
the artillery crews scattered, the Austrian artillery is the first unit to
break in the battle dealing a blow to the morale of the nearby Austrian troops.
In a vain attempt to enact some revenge for the loss of their artillery, von
Werneck rides up to the grenadiers of the 2nd Brigade 4th
Infantry Division and orders them to open fire on the Batavian cavalry with
little to no effect. The remaining brigades of the Austrian III Corps 4th
Infantry Division split their focus with the 1st Brigade moving into
a nearby patch of trees to support the charge of 3rd Brigade towards
one of the advancing French Brigades. In the background the guns of the
remaining Austrian III Corps artillery can be heard blasting away at the
advancing French infantry.

Figure 9
– French Cavalry Lands a Blow to the Austrian Morale
The poor success if the Austrian grenadiers continues as the
men of the French 11th and 35th Line regiments stand
their ground and drive back the attacking Austrian infantry with heavy
casualties inflicted upon the grenadiers.

Figure 10
– The Grenadiers are Driven Back!
To plug the gap that has been punched into the Austrian
line, von Werneck sends word to his 2nd Cavalry Division to advance
and prevent further French cavalry breakthroughs. The Dragoons of the 2nd
Cavalry Division form column and begin advancing through the town of
Heidenheim.

Figure 11
- Austrian Dragoons Advance. This is the other unit I had to use Proxies for.
Over to the north, attempts by Feldmarschall-Leutnant
Jellačić to interrupt the building French attack begins to pay off. The grenzers
of the Austrian I Corps 1st Infantry Division move outside of the
nearby farmhouse while the men of the Austrian #12 and #21 Infantry regiments
occupy the farmhouse itself. The grenzers quickly begin to skirmish with the
advancing French columns bringing the French to a halt as they deploy their own
light infantry companies to meet this threat. All the while, Austrian artillery
continues to pound on the light infantry regiments of the French III Corps 2nd
Infantry Division. The Austrian III Corps 1st Infantry Division is
now successfully deployed around the farmhouse and its orchards.

Figure 12
– A Hail of Skirmisher Fire Erupts from the Woods Around the Farmhouse.
Back over with the French II Corps, the success of the
Batavian cavalry brigade at charging the Austrian guns have given them an
opening to continue inflicting damage on the Austrians. Wheeling about, the
Batavian cavalry charges into the flank of a nearby brigade of grenzers from
the Austrain III Corps 3rd Infantry Division, while the rest of the French
II Corps Cavalry Division moves up in support looking for an opportunity to
charge. Meanwhile, the infantry of the French II Corps continues to advance
where it can. The 2nd Brigade of the 1st Infantry
Division pursues the retreating grenadiers while the 1st Brigade of
the 1st Infantry Division deploys and opens fire on the Austrian
grenadiers in the woods. Marshal Marmont moves forward offering encouragement
where he can, though he seems to not notice that his 2nd Infantry
Division has become split with one of the brigades moving into action with the
Austrian III Corps 3rd Infantry Division and the other brigade
lagging far behind in difficult terrain.
Charging into the flank of the unsuspecting grenzers, the
Batavian cavalry scores another victory as they force the Austrian light
infantry to withdraw exposing the remaining Austrian artillery batteries to the
oncoming French Cavalry. If the Austrians do not do something soon, these
batteries will suffer the same fate as the rest of the Austrian III Corps
artillery.

On the other end of the battlefield, both sides open up with volley after volley of musketry around the farmhouse and the surrounding area. The entire French III Corps 2nd Infantry Division is blazing away against the Austrians that have advanced to meet them. Caught in a crossfire between Austrian artillery and infantry, the 15th Légère of the French III Corps 2nd Infantry Division nearly breaks as they are raked by solid shot and volleys of musket fire.

Back over around Heidenheim,
Seeing the ever-widening breach in the Austrian lines, the 2nd
Cavalry Division of the Austrian III Corps charges into the gap with the
Dragoons of the 2nd Brigade (the #1 Archduke John regiment) meeting
the Batavian cavalry head on in a charge. At this point the luck of the
Batavian’s runs out as the Austrian cavalry forces them to retreat from the
melee. The 1st Dragoon Brigade (the #2 Hohenlohe regiment) takes up
position on the road as they prepare to charge.
The Austrian III Corps 4th Infantry Division tries to break the advance of the French II Corps 1st Infantry Division with another bayonet charge, but this charge meets the same fate as the previous one ending in a failure. The grenadiers are lacking the normal punch they would bring to a fight as they are still fatigued from the forced marching they had done earlier in the campaign. At this point von Werneck, who is still with the 3rd Brigade of the 4th Division, begins to organize a withdrawal of the Austrian grenadiers as they have failed to halt the French advance.

Figure 15
– Austrian Cavalry Counter Charges the French. Austrian Grenadiers are Unsuccessful
for the Second Time.
The French II Corps cavalry division tries to reform and
prepare to face the oncoming Austrian Dragoons. Luckily for the French, the II
Corps’ cavalry screen has finally arrived on the field, which brings a fresh
brigade of French cavalry to the action. This brigade still has to march a
small distance to meet up with the rest of the division. However, the momentum
of Marshal Marmont’s attack has started to die off. The French have managed to
score some heavy hits on this side of the battle, but it has left the French
forces a little exhausted. This lull in French aggressiveness may give the
Austrian’s the breathing room they need to hold their position. Marshal Marmont
will need to work hard to get his Corps motivated and back on the offensive once
again.

Figure 16
– French II Corps Attack Loses Momentum. Only Minor Skirmishing Takes Place.
Marshal Davout’s Corps around Donauworth on the other
hand manages to keep up the pressure on the Austrian’s. The 15th
Légère is forced to fall back before they break and run, leaving a gap in the
line between Davout’s two infantry divisions. The Austrians grenzers in the
woods outside the farmhouse are suffering badly under the combined musket
volleys of two entire French Brigades, while the Austrians in the hay field are
faring much better.
While the attack on the farmhouse continues, the 3rd
Division of the French III Corps makes an attack at the uncommitted Austrian I
Corps 2nd Infantry Division with several musket volleys hitting the
Austrian artillery on the road forcing the batteries to break and flee the
field, damaging Austrian morale. This attack while initially successful, may
prove to be overly aggressive as the flank of the French 3rd Infantry
Division is left hanging in the air open to an attack.

Figure 17
– French Attack under Davout Continues.
Taking advantage of the break in the French assault towards Heidenheim,
von Werneck orders the remaining effective grenadiers and the fresh division of
Dragoons to continue the attack on French forces. Von Werneck leads the 4th
Infantry Division’s 3rd Brigade forward himself as the 1st
and 2nd Brigades of Dragoons crash into the French light cavalry
brigades. The exchange of musketry between the French infantry and the
grenadiers is fierce, but both sides are still committed to the fight with
neither backing down.
The results of the Austrian cavalry charge are brutal, the 6th
Hussars of the 1st Brigade of French II Corps Cavalry Division are
nearly broken out right from the intensity of the charge of the Austrian 1st
Brigade Dragoons (the #2 Hohenlohe). The French Hussar regimental commander must
have been caught unawares, as there could be no other explanation for such a devastating
result. The Hussars are forced to fall back unable to offer any support while Batavian
cavalry is also forced back again leaving both brigades nearly at the point of
breaking.
Side Note: I am trying to keep the game mechanics at a
minimum in this report and just focus on the story telling, but the fate of the
6th Hussars was one of those crazy dice roll moments. Both Austrian
and French brigades were fresh (full 6 Èlan each) which means that both sides
roll 6x d6 die when resolving combat. Hits are scored on a roll of 4 or higher,
with the difference between the number of hits being the reduction in Èlan
that is inflicted on the loser (the attacker does lose an Èlan
for the effort of the attack). The French rolled zero hits and the Austrians
rolled 5 hits. Which means that that the 6th Hussars nearly broke
immediately at their first taste of battle having received 5 hits leaving them
at 1 Èlan.
Talk about a bad dice roll.

Figure 18
– Von Werneck Leads the Grenadiers and Dragoons in a Counterattack as a
Depleted Brigade of Grenadiers Withdraws.
Over at Donauworth, Fieldmarshal-Lieutenant Jellačić
seizes on the vulnerability of the French III Corps 3rd Infantry Division
and orders his cavalry and 2nd Infantry Division to attack the
approaching French infantry in order to defend the town of Donauworth.
The French infantry of the 3rd Division are caught out in the open
and take serious damage from both the accurate volleys of Austrian musketry
(the grenadiers of this division were better trained at shooting apparently,
unlike their friends in the Austrian III Corps…) and the flanking charge of
Austrian #5 Klenau Regiment of Chevau-léger. The men of the French 12th
and 21st Line regiments are forced to fall back in the face of the Austrian
cavalry charge, leaving the remaining two regiments in the French 3rd
Infantry Division to face the counter attacking Austrians alone.

Figure 19
– Austrian I Corps Goes on the Offensive, Brutalizing the French 3rd
Infantry Division.

Figure 20
– Shootout at the Farmhouse Continues. Austrian Grenzers are Near the Breaking
Point.
No comments:
Post a Comment