
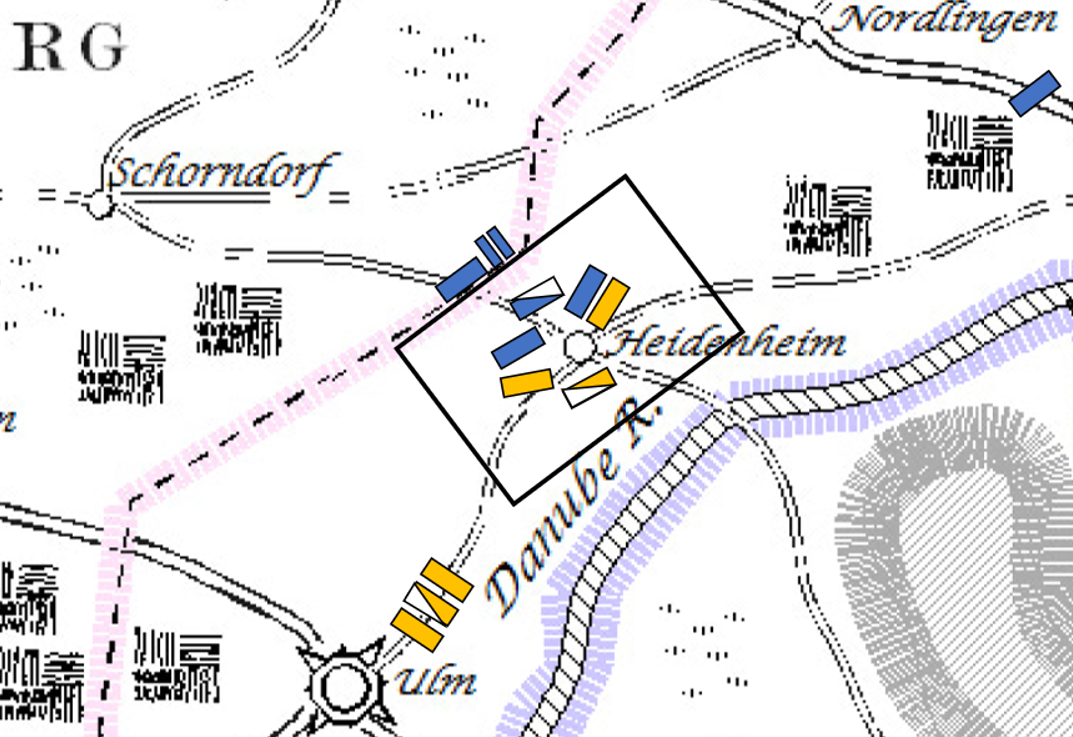
Battle 2 – During Turn 7 of the Campaign, late afternoon.
Attacker: French
Objectives: Take the town of Heidenheim. Capture or destroy
as many Austrian units as possible
Defender: Austrians
Objectives: Withdraw from the battlefield with more than 60%
of remaining troops intact.
Special Objectives: Should General Mack arrive with
sufficient forces, hold Heidenheim until game ends after turn 12.
Battle End conditions: 50% or more of the remaining Austrian brigades are routed off the field or after 12 turns.
This battle takes place immediately after the end of Battle
1 – The Battle of Donauworth & Heidenheim, that was fought
using the Blucher rules. At the start of this battle portions of both the
French and Austrian armies are engaged in combat based upon where the previous
battle ended. The French are still attempting to capture the town of Heidenheim
and destroy as many Austrian units as possible while the Austrians are
attempting to withdraw from the battlefield since there have been no
reinforcements from the rest of the Austrian III Corps.
Reinforcements
Reinforcements are classified in two ways for this battle,
off table reinforcements and marching reinforcements. The French will start
with the II Corps Dutch Division and the II Corps Artillery Park as off table
reinforcements. Off table reinforcements can be called on the battlefield as
normal with the General d’Armee rules as they are just outside of the current battlefield
for this game. Under normal General d’Armee rules, off table reinforcements are
called onto the field through committing ADCs to bring them up. Marching
reinforcements are those troops that are in marching distance of the
battlefield. This would include the other half of the Austrian III Corps under
General Mack and the French III Corps 1st Division if it is called
into action. For these marching reinforcements to arrive for a particular army,
that army will roll 2x D6 dice and attempt to score a roll of less than or
equal to the current turn value. This means such reinforcements will not be
able to arrive until after turn 1 unless the roll is modified (see below). Once
marching reinforcements have arrived, they will then be treated as off table
reinforcements.
Since the French III Corps 1st Division was
already in the area of Donauworth, sections of this Division may be
called upon as Marshal Davout was also in need of support for his continued
assault.
General d’Armee Basics
Turns General d’Armee are considered to take place
simultaneously with both sides taking turns to execute each phase of the game
turn. Each turn consists of an activation, charge, movement, shooting, and
melee phase. The order of these phases will influence the narrative of the
battle report. The side that goes first within each phase of the game turn is
determined at the start of the game turn via an initiative roll-off between
both sides. General d’Armee also uses a basic activation system for each
brigade to determine if the battalions or squadrons/regiments in that brigade
will follow orders that turn. These activation attempts can be improved by the
use of Aides-de-Camps (ADCs) that can help motivate or issue special orders to
the brigades. Since I am adding an extra layer to the reinforcement system in
General d’Armee, I have also added a rule where ADCs can be used to reduce the
value of the roll for marching reinforcements by a value of 1 for each ADC
committed to the attempt to call upon marching reinforcements. ADCs must be
committed to each task before rolls are made.
Conversion between Blucher and General d’Armee
In the previous game using the Blucher rules, damage to units
was recorded as a loss of Elan. In General d’Armee such loss of combat
effectiveness is recorded as casualties, with each unit having fewer or more
max possible casualties depending on the troop quality and unit size. I have
used the troop quality classifications of units being either Elite, Standard,
or Recruit for this battle as provided by the General d’Armee rules with each
classification having its own number of max possible casualties (15 for Elite,
12 for Standard, and 10 for Recruit). There are more classifications provided
by the rules that I may make use of in the future. To properly translate the
effects of the previous battle on to the current battle, I did a simple
conversion based on the max Elan of the unit in question, its assigned classification
in General d’Armee with that associated max possible casualties, and the damage
to the current unit. Any unit broken from the previous game was considered
dispersed in this game (the General d’Armee term for units removed from play).
Example Conversion
Unit is Standard and lost 4 Elan in battle. Max Elan was 6.
As a Standard unit it would have a maximum number of 12 casualties in General
d’Armee.

Even though the term used in General d’Armee is casualties, the authors notes describe the value in similar ways to that of Elan from Blucher. Where the number being recorded is a loss of manpower, moral, ammunition, accumulated fatigue, and loss of unit cohesion.
Order of Battle – French
French units currently on the field, unless stated
otherwise. The numbered grids next to each battalion indicate the number of
casualties currently held by the battalion based upon the effects of the first
part of the battle.


French off table reinforcements. French off table
reinforcements have accrued casualties via exhaustion due to forced marches.


French marching reinforcements. These troops are part of Marshal
Davout’s III Corps and could be called upon to aid in the battle in the same
way that General Mack’s troops could.

Order of Battle – Austrians
Austrian units currently on the field, unless stated
otherwise.


Austrian marching reinforcements under General Mack.


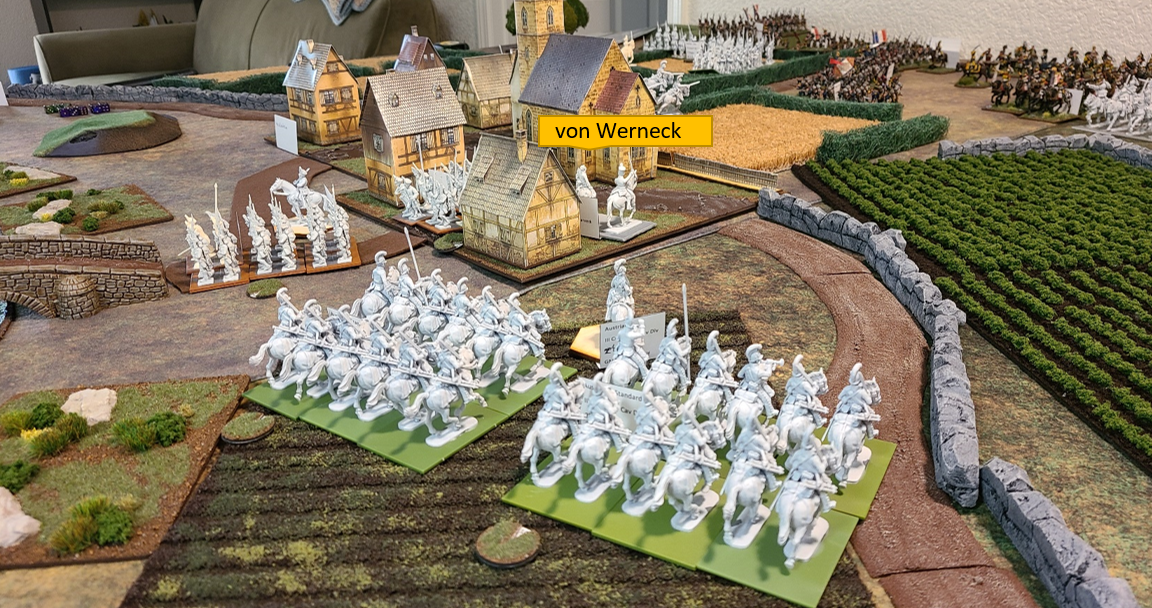
Battlefield Overview
At the start of the battle von Werneck is faced with a major
dilemma, his 4th Infantry Division has been badly mauled by the days
fighting and both of the remaining brigades in the division are on the verge of
breaking. Only the 1st and 2nd Brigades of the 4th
Infantry Division remain active on the field, but they are not in supporting
distance with one another. The 2nd brigade is almost at the bridge by
the Danube River, while the 1st brigade is currently
attempting to hold back the oncoming French infantry. Both brigades are of
elite grenadiers, so they are still a dangerous target, but their ability to
stay on the field as an effective force has nearly been exhausted.

Figure 2
- Overview of the Battlefield. Arrow in the Lower Righthand Corner Points North.
Further north of the town of Heidenheim, the fresh
and more capable Austrian 3rd Infantry Division is engaging the
flank of the French attack. Even though this may seem to be an advantageous
position, the 3rd Infantry Division is in danger of being cut off
and separated from their line of retreat due to the advancing French Cavalry
Reserve (CR) and the remains of the French II Corps Cavalry Division. The only
troops that von Werneck might be able to use to halt the French Cavalry are the
depleted brigades of Austrian Dragoons from the 2nd Cavalry
Division. Von Werneck’s goal will be to try and have his 3rd Infantry
Division disengage and withdraw towards the Danube River crossing. This
division cannot retreat towards Donauworth, as French cavalry had
already cut the road in the previous game. Which means that escape via that
direction is impossible.
The only thing that might turn this battle around is the
arrival of General Mack with the rest of the Austrian III Corps. Von Werneck
will be dedicating as much effort as he can spare to possibly bringing General
Mack to the battle to save the situation.


Figure 4
- Austrian 3rd Division facing off against the French.
Marshal Marmont on the other hand is very determined to continue the attack. Marmont knows he is racing against the clock in several regards. He needs to drive the Austrians off the field and hopefully inflict more casualties before night fall (game end on turn 12), but he also needs to do this before General Mack arrives with reinforcements. While Marmont does not know the full extent of the possible Austrian reinforcements, he is aware that any reinforcements could severely alter the flow of the battle by either giving a massive boost in available troops to the Austrians or just even dragging out the battle. Both are eventualities that the French want to avoid.
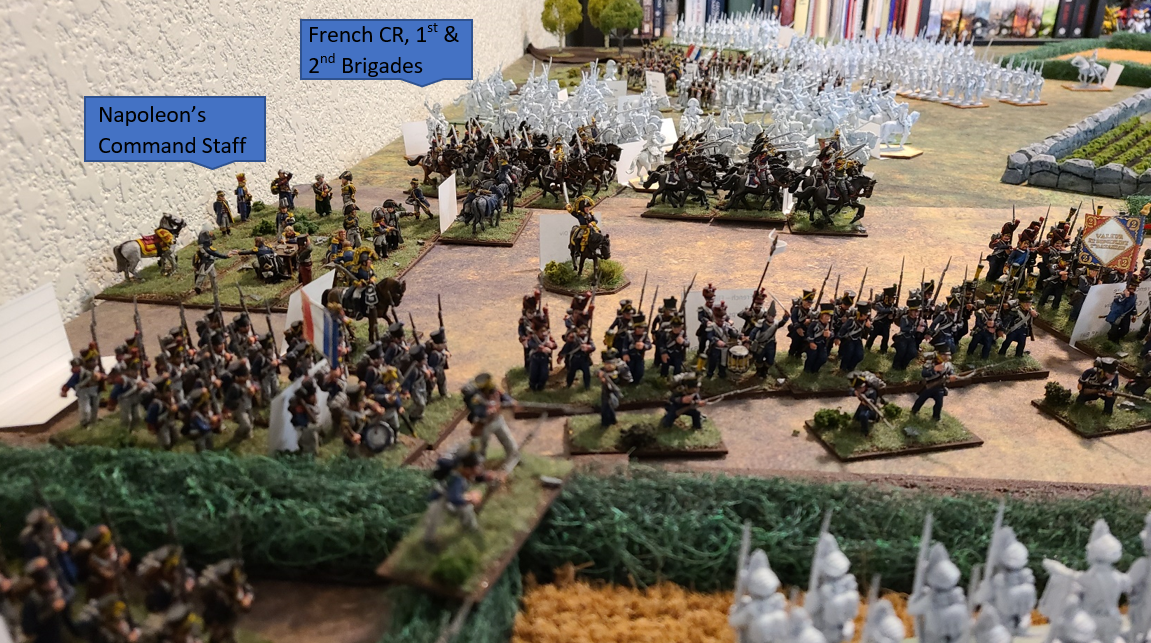
Figure 5
- French Cavalry on the Move to Break the Austrian Lines.
Marmont’s best bet to inflict the most damage on the
Austrians is to continue with his planned heavy cavalry assault along with the
remains of his II Corps Cavalry Division. The plan will be to pin the Austrian
infantry in place with French infantry and hit them in the flanks with cavalry
charges, causing the entire Austrian flank to collapse. He will be performing
these maneuvers under the watchful gaze of the Emperor Napoleon. While this
cavalry attack goes off, Marmont plans to bring up his newly arrived artillery
and use his 1st Infantry Division to drive towards the town of Heidenheim.
Marmont also has more reserves on hand that he can call up to influence the battle. These troops are operating as off table reserves and are able to be brought up more easily since they are already on the field. The only issue Marmont faces is that there is not enough room to deploy all of the available reinforcements at this time. Which means that the Austrian grenadiers in front of the French 1st Infantry Division need to be pushed back to open up room for the rest of Marmont’s Corps to deploy.
No comments:
Post a Comment