Turn 3
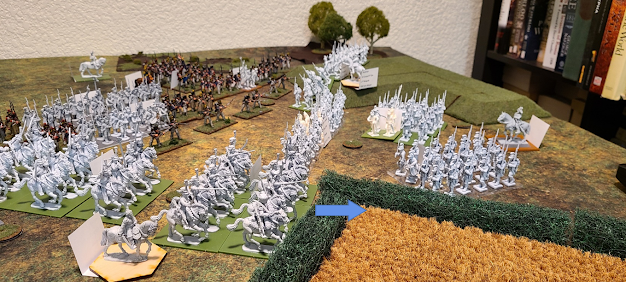
A break in the smoke covering the
battlefield brings a new beat to the sound of battle as a full brigade of
French Cuirassiers charge the waiting Austrian Dragoons. Marshal Marmont has
finally managed to get General of Division d'Hautpoul moving with his entire
Cavalry Reserve Division. The French heavy cavalry lead the assault to break
the center of the Austrian line while the remaining light cavalry of the 6th
Hussars and the 8th Chasseurs charge the lines of retreating
Austrian infantry.
The impact of the French
Cuirassiers is immediately felt as half of the Austrian #2 Dragoons Hohenlohe
regiment breaks immediately and disperses from the field. The other half of the
regiment is locked in a vicious melee of rearing horses and slashing sabers.
Figure 31
- French Cuirassiers Break the Austrian Lines
Figure 32
- French II Corps Cavalry Charges the Austrian 3rd Infantry
Division.
The French light cavalry inflicts heavy casualties on the
Austrian 3rd Infantry Division, first by dispersing the 1st
Battalion of the Austrian #17 Line Regiment which failed to form square in time.
The resulting panic caused the entire 1st Brigade of the Austrian 3rd
Infantry Division to break and disperse across the battlefield. The remaining
brigade in the Austrian 3rd Infantry Division is now cut off from
their line of retreat and is very close to being surrounded.
At this point Von Werneck has given up hope that General
Mack will appear at all today. He orders the remaining forces around Heidenheim
to begin withdrawing. There is little hope that any of the remaining units from
the Austrian III Corps 3rd Infantry Division will be able to escape
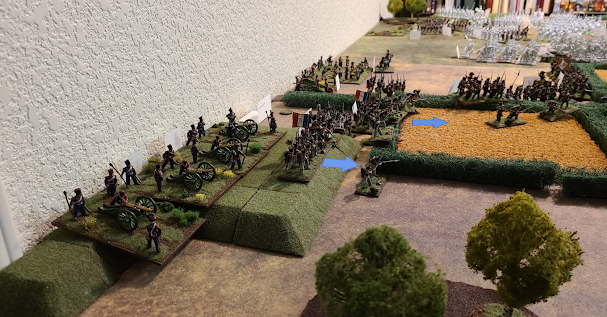
now that the French have broken the Austrian lines. Marshal Marmont, seeing the
change in Austrian dispositions orders his 1st Infantry Division to
advance and take the town of Heidenheim.
Figure 34
- French II Corps 1st Infantry Division Begins to Advance with Artillery
Support.
Figure 35
- Austrian Dragoons Begin to Withdraw.
In the center the French attack more Cuirassiers move
forward in the break in the Austrian lines, this however is going to expose the
heavy cavalry to fire from the Austrian grenadiers that are still defending the
town of Heidenheim.
Figure 36
- The Cavalry Assault Continues.
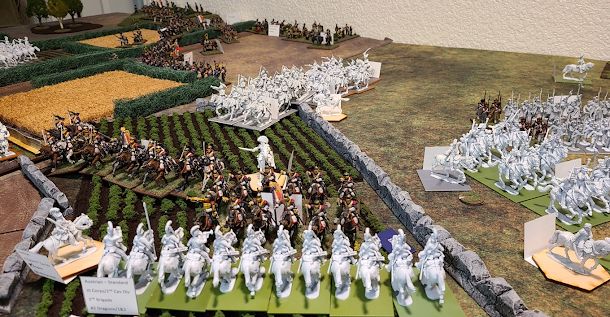
The final moment of the battle comes when the remaining squadrons of the Austrian #2 Dragoons Hohenlohe regiment finally breaks. Out number, demoralized, and exhausted the troopers of the Austrian cavalry could not stand against the elite and very fresh heavy cavalry that they were asked to hold back. General-Major Weissenwolf, commander of the 2nd Brigade of the Austrian III Corps 2nd Cavalry Division orders his troopers to break and head for the river crossing. He knows that this order dooms the remains of the Austrian 3rd Infantry Division to capture, but there is nothing more that he can do.
Figure 37
- The Odds Were Very Heavily Stacked Against the Austrians in this Combat.
At that moment the Austrians under the command of von
Werneck were no longer an effective fighting force and a general withdrawal
ensued. Feldmarschall-Leutnant von Lindenau, commander of the Austrian 3rd
Infantry Division, ordered the remains of his division to cease fire and
surrender seeing as there was no way his men could escape French encirclement.
Figure 38
- Overview of the Broken Austrian Lines.
Both Marshal Marmont and Napoleon look on as the remaining
Austrian forces withdraw from the battle through the hazy smoke of the
battlefield. Word has yet to arrive from the North with the results of Marshal
Davout’s attack on Donauworth, but with the information on hand Napoleon
can count this battle as a success for the time being.
Figure 39
- French High Command Surveys the Battlefield.
Rear-Guard at Heidenheim Results
The rear-guard action ends as a victory for the French for
the moment. Until word comes from Marshal Davout, only the results of this end
of the battlefield can be calculated. At the start of the entire battle (using
the Blucher rules) and then proceeding into this battle with the General
d’Armee rules the following results can be determined.
French Results
In total, Marshal Marmont entered battle with 2x infantry divisions,
2x cavalry divisions, and his Corps artillery. Early in the engagement(beginning
of the day) the 2nd Brigade of the 2nd Infantry Division
was broken and routed from the field along with the Batavian Cavalry Brigade
from the II Corps Cavalry Division. Additional units were lost along with
accumulated casualties over the course of the rear-guard action with the
dispersing of two battalions from the 2nd Brigade of the 1st
Infantry Division. This does not include the fatigue incurred on the units from
the French II Corps that had to force march to the battlefield (the Corps
artillery and the 1st Dutch Division).
In total this produced a loss of around 20% losses for the
French. Marshal Marmont will have to determine how and with which troops he
wants to continue the pursuit of the retreating Austrians. Marmont also has to
the opportunity to attempt and reform his broken and dispersed units from the
survivors scattered around the battlefield. This will require a balancing of
objectives and a desire to allow his fatigued units to rest.
Austrian Results
Von Werneck started the battle with about half of his III
Corps total strength: 2x infantry divisions, 1x cavalry division, and his corps
artillery. Of the artillery deployed by the Austrians; 2x batteries were broken
and routed off the field due to a French cavalry charge. The other 2 batteries
were forced to retire from battle after having expended their supply of
ammunition. These two surviving batteries will be easily resupplied and
returned to active service.
However, Austrian infantry casualties were much worse. Of
the two infantry divisions that participated the 3rd Infantry
Division has nearly ceased to exist. The Genzers of the 1st Brigade
were broken early in the battle, the remains of the 1st Brigade
dispersed later during the rear-guard action, and the entire 2nd
brigade has been captured by the French. The 4th Infantry Division
looks little better, two of the three brigades in the 4th Infantry
Division have been completely routed off the field and the remaining brigade is
barely at effective strength. Looking at the total 16 Austrian infantry
battalions that fought around Heidenheim, 4 battalions have been
captured, 10 have been routed from the field, and only 2 remain in some
recognizable formation. This is a total of about 87% losses in the infantry
(not counting the actual casualties inflicted upon the remaining battalions).
The Austrian cavalry looks little better. Of the two
brigades, one has been completely routed and the other is at roughly 50%
strength. These results all calculated show that the Austrians under the
command of von Werneck suffered about 75% casualties trying to hold open the
approaches to Heidenheim for General Mack.
Von Werneck’s goal in the coming hours will be focused on
continuing the retreat and trying to rally broken units. There is the the
potential to bring a decent portion of his troops back into some semblance of
order. The biggest challenge is that von Werneck needs to trade space for time
to get his troops back to a combat effective state. This course of action has
several problems associated with it, the first is that further withdraw will
deepen the gap between the two sections of the Austrian III Corps. The second
problem is the French cavalry, as Marmont could choose to attempt and finish
off von Werneck’s section of the Austrian III Corps by ordering his cavalry to
pursue the retreating Austrians.
Outcome
While blame for the Austrian losses could very easily be
laid at the feet of von Werneck for recklessly attacking the French forces, we
must also recall that it was von Werneck’s job to hold back the French II Corps
so that the other half of the Austrian III Corps could enter the battle. Von
Werneck has managed to retreat across the Danube River with what little remains
under his direct command, which in of itself is an achievement of note.
For Marshal Marmont, the localized victory is not as
stunning as it could have been. Serious issues with commanding the French
Cavalry Reserve prevented a much greater success that could have been achieved.
There is also the issue of Marmont’s failure to take the town of Heidenheim by
force. The town was eventually taken, but only after the Austrians had left it
empty for Marmont to walk in and take. Though some credit does need to be given
to Marmont for forcing the surrender of an entire Austrian brigade and
inflicting serious casualties on the Austrians. However, it could be debated
that some of the credit for the French victory goes to General Mack for failing
to arrive on the field. It appears that General Mack is trying to outperform
his historical record.
Next will be the rear-guard action around Donauworth.


No comments:
Post a Comment