Friday, October 29, 2021

Rear Guard at Heidenheim - Part 3 Conclusion

 Turn 3

A break in the smoke covering the battlefield brings a new beat to the sound of battle as a full brigade of French Cuirassiers charge the waiting Austrian Dragoons. Marshal Marmont has finally managed to get General of Division d'Hautpoul moving with his entire Cavalry Reserve Division. The French heavy cavalry lead the assault to break the center of the Austrian line while the remaining light cavalry of the 6th Hussars and the 8th Chasseurs charge the lines of retreating Austrian infantry.

The impact of the French Cuirassiers is immediately felt as half of the Austrian #2 Dragoons Hohenlohe regiment breaks immediately and disperses from the field. The other half of the regiment is locked in a vicious melee of rearing horses and slashing sabers.
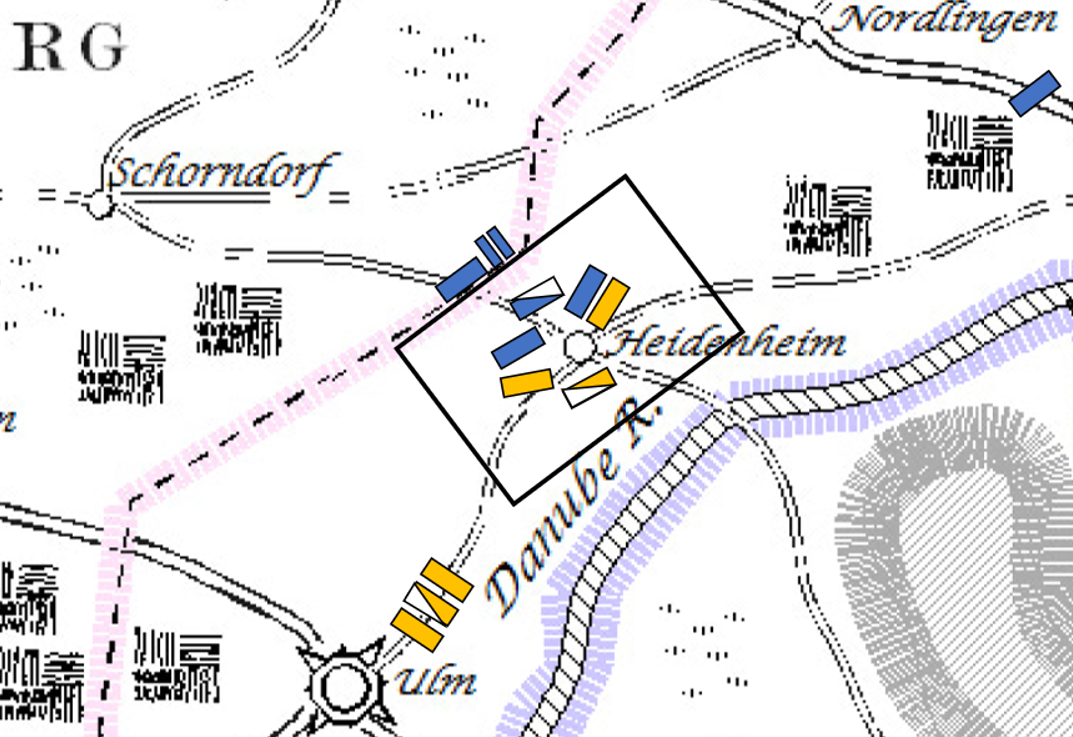
Figure 31 - French Cuirassiers Break the Austrian Lines

Wednesday, October 27, 2021

Rear Guard at Heidenheim - Part 2 The Battle

 Turn 1

The rear-guard action starts with both von Werneck and Marmont issuing orders to their ADCs to be passed on to the division and brigade commanders. Marmont focuses on calling up his artillery and ordering his 1st Infantry Division to assault the Austrian grenadiers to their front. Von Werneck orders some of his ADCs to seek out General Mack while the rest of his ADCs hurry to issue orders to the grenadiers facing the French advance. Word quickly comes back to Marmont that the II Corps Artillery is moving up and will arrive on the field shortly and that the infantry assault of the 1st Division will commence immediately. Much to Marmont’s frustration, General of Division d’Hautpoul commander of the Cavalry Reserve, seems to have only ordered one of his two brigades forward, instead of moving the entire division forward as was ordered. This will slow down the planned French attack on the Austrian center.

Von Werneck does not fare much better, as no word seems to have come back from the ADCs about the status of General Mack’s reinforcements. There is also some hesitation in a few of brigade commanders on the field due to the situation at hand, causing a delay in the withdrawal of the Austrian 3rd Infantry Division towards the Danube River.

Following his newly arrived orders from Marmont’s ADC, General de Brigade Soyez commander of the 2nd Brigade in the French II Corps 1st Infantry Division orders his battalions to charge the opposing Austrian Grenadiers. The 2nd Battalion of the 35th Line and the 1st Battalion of the 11th Line lead the charge with the remaining two battalions in the brigade lending support to the attack. As the assaulting battalions clear the brigade’s skirmisher screen the waiting Austrian grenadiers fire off volleys of well-coordinated musketry into the advancing French columns. The result is devastating on the already worn-out battalions of Soyez’s brigade and the attacking battalions break instantly under the brutal fire causing panic in the entire brigade. The attempt to quickly brush aside the exhausted Austrian grenadiers has failed for the moment and Soyez is forced to try and rally his brigade to avoid a general route of his two regiments.

Figure 1 - Austrian Grenadiers Hold off the French Assault.

Tuesday, October 26, 2021

Rear Guard at Heidenheim - Part 1 Game Setup

 Battle 2 – During Turn 7 of the Campaign, late afternoon.

Attacker: French

Objectives: Take the town of Heidenheim. Capture or destroy as many Austrian units as possible

Defender: Austrians

Objectives: Withdraw from the battlefield with more than 60% of remaining troops intact.

Special Objectives: Should General Mack arrive with sufficient forces, hold Heidenheim until game ends after turn 12.

Battle End conditions: 50% or more of the remaining Austrian brigades are routed off the field or after 12 turns.


Figure 1 - Battle Layout.

This battle takes place immediately after the end of Battle 1 – The Battle of Donauworth & Heidenheim, that was fought using the Blucher rules. At the start of this battle portions of both the French and Austrian armies are engaged in combat based upon where the previous battle ended. The French are still attempting to capture the town of Heidenheim and destroy as many Austrian units as possible while the Austrians are attempting to withdraw from the battlefield since there have been no reinforcements from the rest of the Austrian III Corps.

Tuesday, July 27, 2021

The Battle of Donauworth & Heidenheim - Part 4

 The Battle is Lost, Retreat towards the Danube

Turn 9

At the start of turn 9, the French morale is at 7 and the Austrian morale is at 1. The Austrians are in desperate need of reinforcements to boost morale and provide fresh brigades with which to fight the French.

Even with the arrival of Napoleon, the momentum of the French army seems to fluctuate across the battlefield. This causes issues all across the French army command, resulting in failure to launch a full scale coordinated attack that involves both the fresh reinforcements and the troops currently engaging the Austrians. Doing what they can, the French launch attacks hoping to finally break the Austrian morale. The tipping point comes when the 8th Chasseur Regiment is ordered to charge the Austrian III Corps 3rd Infantry Division. This charge is desperately needed to help the lone remaining brigade of the French II Corps 2nd Infantry division. The hard charging Chasseurs slam into the already unsteady #17 Grenzer Regiment shattering the regiment and forcing them to flee from the field handing victory to the French. This charge is not the last act in the battle, but it is the moment from which point the Austrians began to break from the engagement on mass as von Werneck tries to organize a withdraw of the remaining intact brigades of his command. His troops are going to have to fight their way out of this situation to get back across the bridges.

Figure 1 -The 8th Chasseurs Charge into the Austrian Infantry.

Monday, July 26, 2021

The Battle of Donauworth & Heidenheim - Part 3

 The Battle at Midday: The French Reinforcements Arrive, where is Mack?

Turns 5-8

At the start of turn 5, the French morale is at 6 and the Austrian moral is at 3. At the end of turn 6, reinforcements can start arriving for both the Austrians and the French.

Shocked into action by the sudden Austrian counterattack, Marshal Marmont is finally able to get his corps moving again. However, he is now forced on to the defensive in the face of Austrians cavalry charges. Marmont sees that he is in the same situation the Austrian’s had faced earlier in the battle, with a gap in his lines and Austrian cavalry charging into the breach. Marmont issues orders instructing his 1st Infantry Division redeploy and close the gap, the men of the 18th Légère jump to the task wheeling about and marching towards the fray. The Batavian cavalry charges again as nearby French infantry open fire on the Austrian Dragoons. Hoping against all odds, the Batavian cavalry seek to force back one of the Austrian Dragoon brigades. This sacrificial charge fails to deal significant damage to the Austrian Dragoons and breaks the Batavian cavalry as result, dealing a blow to the French morale. Hopefully, this sacrifice has bought the French II Corps some time.

Figure 1 – The French II Corps Redeploys to Meet the Austrian Breakthrough.

Saturday, July 24, 2021

The Battle of Donauworth & Heidenheim - Part 2

 The Morning of Battle: The Opening Shots

Turns 1-4

The battle opens with both French corps moving to attack the Austrians. Marshal Marmont orders that his corps should attack in echelon by division, starting with his 1st Infantry Division leading the start of the maneuver. The goal is to break the Austrian troops guarding the road to Ulm, potentially hindering the arrival of reinforcements from the rest of the Austrian III Corps. A normal attack in echelon attack would typically have started on the opposite end of the French line from the intended target, but Marmont is hoping to throw off the Austrian general and get him to concentrate on the wrong objective, as the link between the two Austrian Corps on the field is just as important as the road to Ulm.

Figure 1 - French II Corps Advances in Echelon to Attach the Austrians

Friday, July 23, 2021

The Battle of Donauworth & Heidenheim - Part 1


The Battle of Donauworth & Heidenheim Overview and Setup

Battle 1 – During Turn 7 of the Campaign.

French: Attacker

Objectives drive Austrian army from the field and seize both Donauworth & Heidenheim.

Austrians: Defender

Hold both Donauworth & Heidenheim until the end of the battle.

Figure 1 - Battle Area as it Pertains to the Campaign Map

Tuesday, June 29, 2021

Test Campaign 1 - Turns 4 -7

 Turn 4

Figure 1 - Campaign Overview Start of Turn 4

The French maintain initiative this turn, and Napoleon realizes that the bottleneck at the Rhine River has put his army in a potentially difficult position. One third of his army is far closer to the Austrian position and the nearest support is several days away. Marshal Davout realizing this problem, decides slows his forward progress and recalls his advanced cavalry to await the arrival of the Napoleon with Marmont’s II Corps. Napoleon orders that Marmont send his light cavalry division further out in front so that it will be in supporting distance of Davout’s III Corps.

Monday, June 21, 2021

Test Campaign 1 - Campaign Start Through Turn 3


Basic Game Overview

This was a test campaign so that I could experiment with the rules that I have been writing for a campaign level games that allows for battles to be fought using miniatures as a result of actions taken on the campaign map. This campaign takes place in the area around Bavaria (southern Germany or just north of the Alps). Both sides (France vs. Austria) have roughly equal armies with each side supporting three army corps worth of troops (See OOB section below). Units are represented on the campaign map as either infantry divisions (solid color rectangle unit marker), cavalry divisions (50% split white rectangle unit maker), cavalry screens (temporarily long grey rectangular magnets), and artillery parks (the unit marks with two sets of three lines).

The maps used are the Murat maps found here. These maps use a node movement system with links between nodes represented by roads. The distance between each node is considered to be the distance an infantry division can march in 1 day (or campaign turn). Cavalry divisions can march two nodes each turn. Artillery can only move 1 node each turn, unless the artillery park is made entirely of horse artillery at which point it can move 2 nodes. Units may force march 1 extra node each turn for a penalty to their combat effectiveness. This penalty can be recovered by resting for 1 turn.

All markers that have a flag and Roman numeral indicate either the Commander-in-Chief of the army (C-in-C) in the case of the numeral I, the armies point of communication and supply with the home country in the case of numeral II, or objectives that develop over the course of the game. These objectives are worth victory points, and those points can be earned through various means.